LoRA微调用于 Phi Silica
您可以使用低秩适应(LoRA)对Phi Silica模型进行微调,以增强其在您特定使用案例中的性能。通过使用LoRA来优化Phi Silica和微软Windows本地语言模型,您可以获得更准确的结果。这个过程包括训练一个LoRA适配器,然后在推理时应用它来提高模型的准确性。
Phi Silica 功能在中国不可用。
先决条件
- 您已经确定了一个增强 Phi 硅响应的用例。
- 您已经选择了一种评估标准来决定什么是“好的回应”。
- 您已经尝试了 Phi Silica API,它们不符合您的评估标准。
训练你的适配器
要为 Phi Silica 模型训练一个 LoRA 适配器以在 Windows 11 上进行微调,您必须首先生成一个训练过程将使用的数据集。
生成用于LoRA适配器的数据集
要生成数据集,您需要将数据拆分为两个文件:
训练.json用于训练适配器。测试.json用于评估适配器在训练期间和训练后的表现。
两个文件都必须使用JSON格式,其中每行是一个单独的JSON对象,代表用户和助手之间的单次对话。每个样本应包含用户和助手之间交换的消息列表。
每个消息对象需要两个字段:
内容: 消息文本。角色: 任一用户或“助手”,指示发件人。
请参阅以下示例:
{"messages": [{"content": "Hello, how do I reset my password?", "role": "user"}, {"content": "To reset your password, go to the settings page and click 'Reset Password'.", "role": "assistant"}]}

{"messages": [{"content": "Can you help me find nearby restaurants?", "role": "user"}, {"content": "Sure! Here are some restaurants near your location: ...", "role": "assistant"}]}

{"messages": [{"content": "今天的天气怎么样?", "role": "用户"}, {"content": "今天的预报是晴天,最高气温为25°C。", "role": "助手"}]}
训练小贴士:
- 每个示例行的末尾不需要逗号。
- 包括尽可能多的高质量和多样化的示例。为了获得最佳效果,请在您的中收集至少几千个训练样本
训练.json文件。 - 该
测试.json文件可以更小,但应涵盖您期望模型处理的交互类型。 - 创建
训练.json和测试.json每行包含一个JSON对象,其中包含用户和助手之间的简短对话。您的数据的质量和数量将极大地影响LoRA适配器的效果。
训练一个LoRA适配器
要训练一个LoRA适配器,您需要以下必需的先决条件:
- Azure 订阅,在 Azure 容器应用 中有可用配额。
- 我们建议使用A100 GPU或更好的设备来高效地运行微调作业。
- 检查您在Azure门户中是否有可用配额。如果您需要帮助查找您的配额,请参阅查看配额。
请按照以下步骤创建工作区并开始微调作业:
-
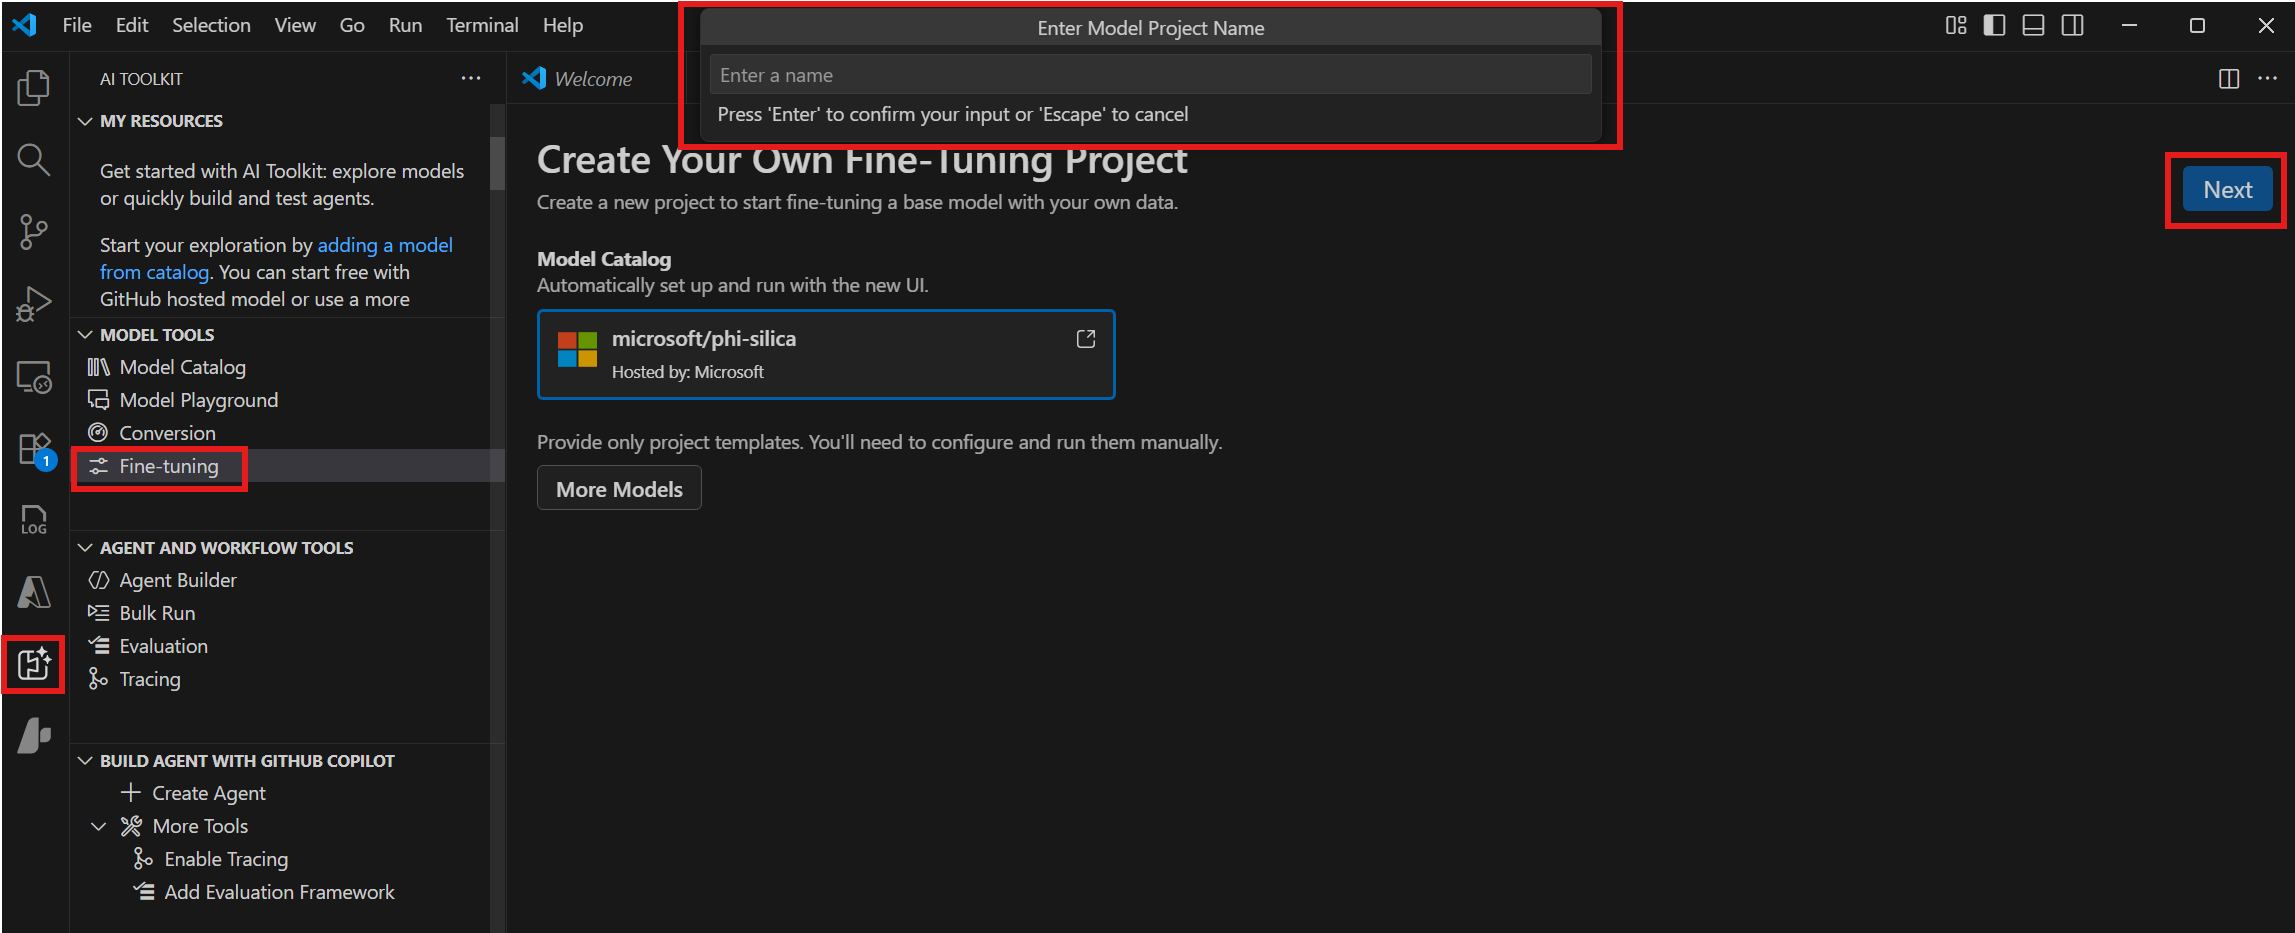
导航到 模型工具 > 微调 并选择 新项目.
-
从模型目录中选择“microsoft/phi-silica”并选择下一步。
-
在对话框中选择一个项目文件夹并输入项目名称。一个新的 VS Code Windows将为该项目打开。
-
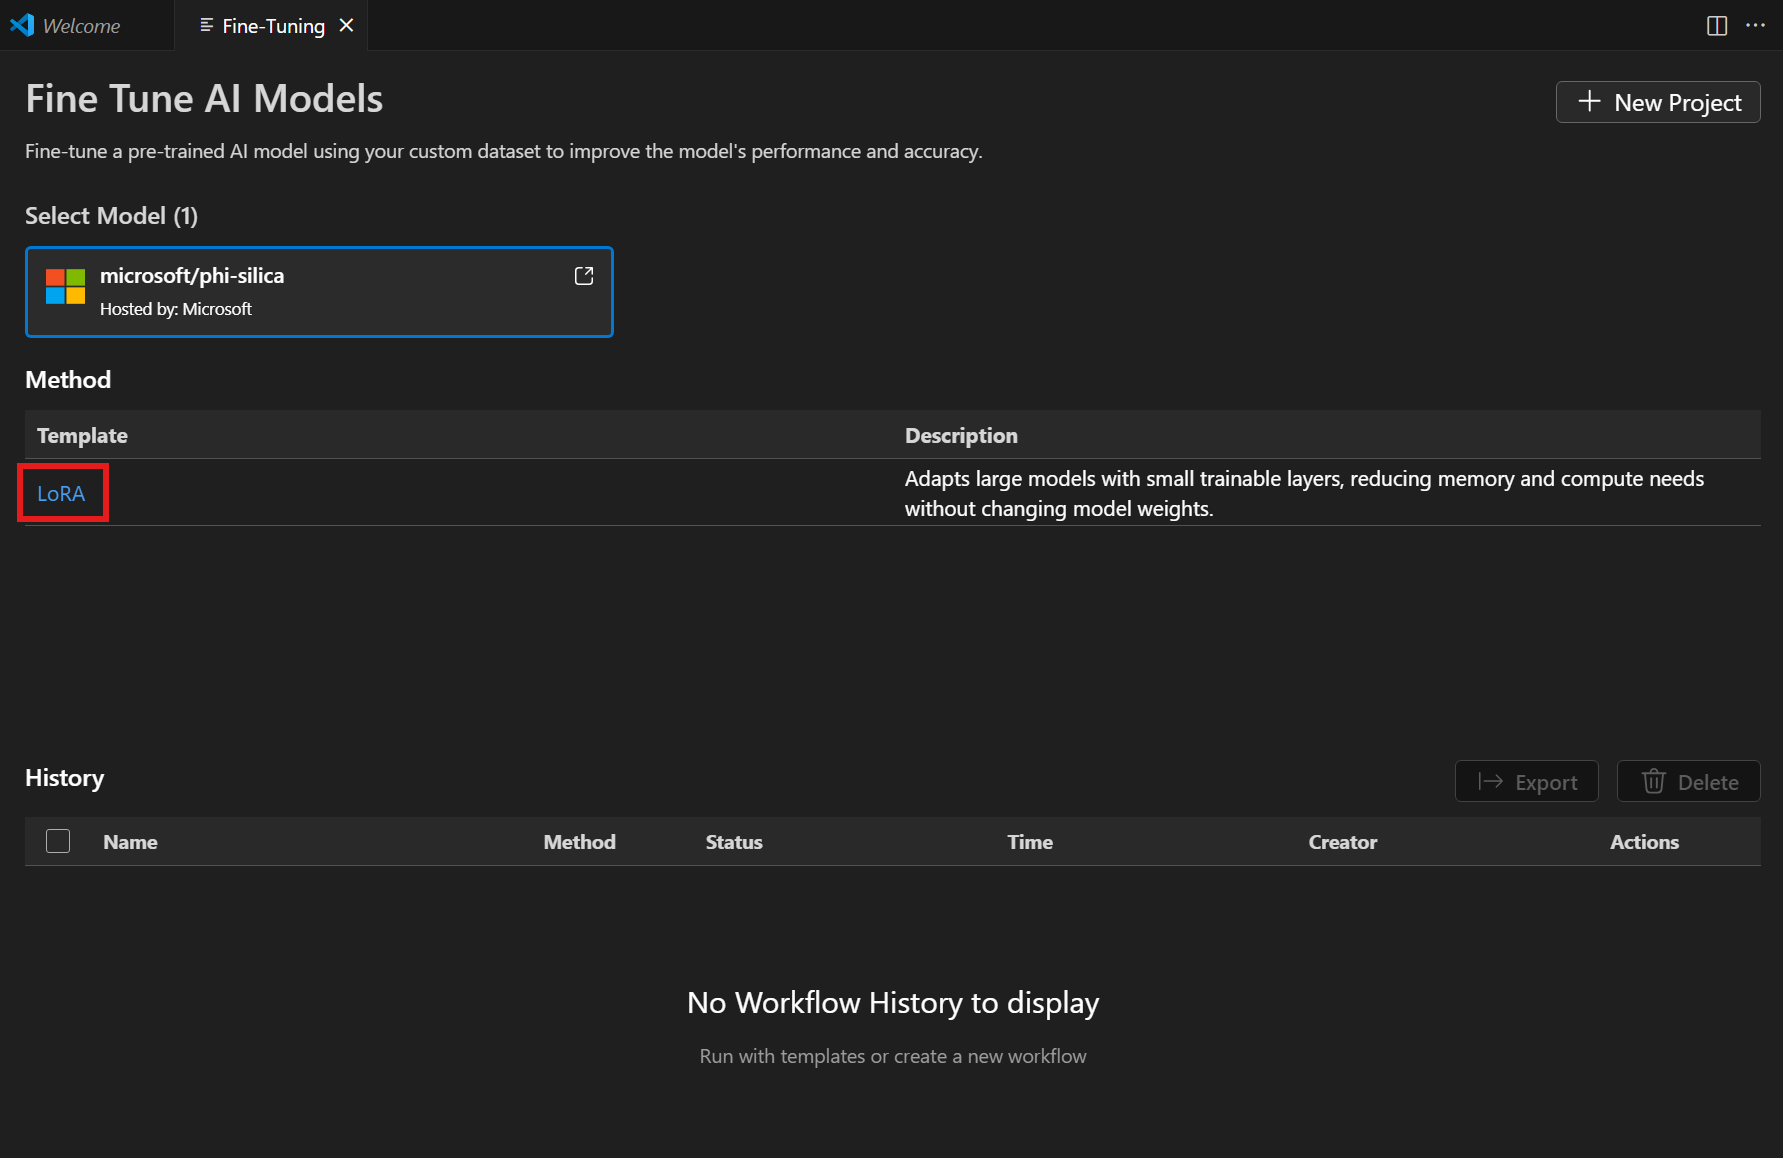
从方法列表中选择“LoRA”。
-
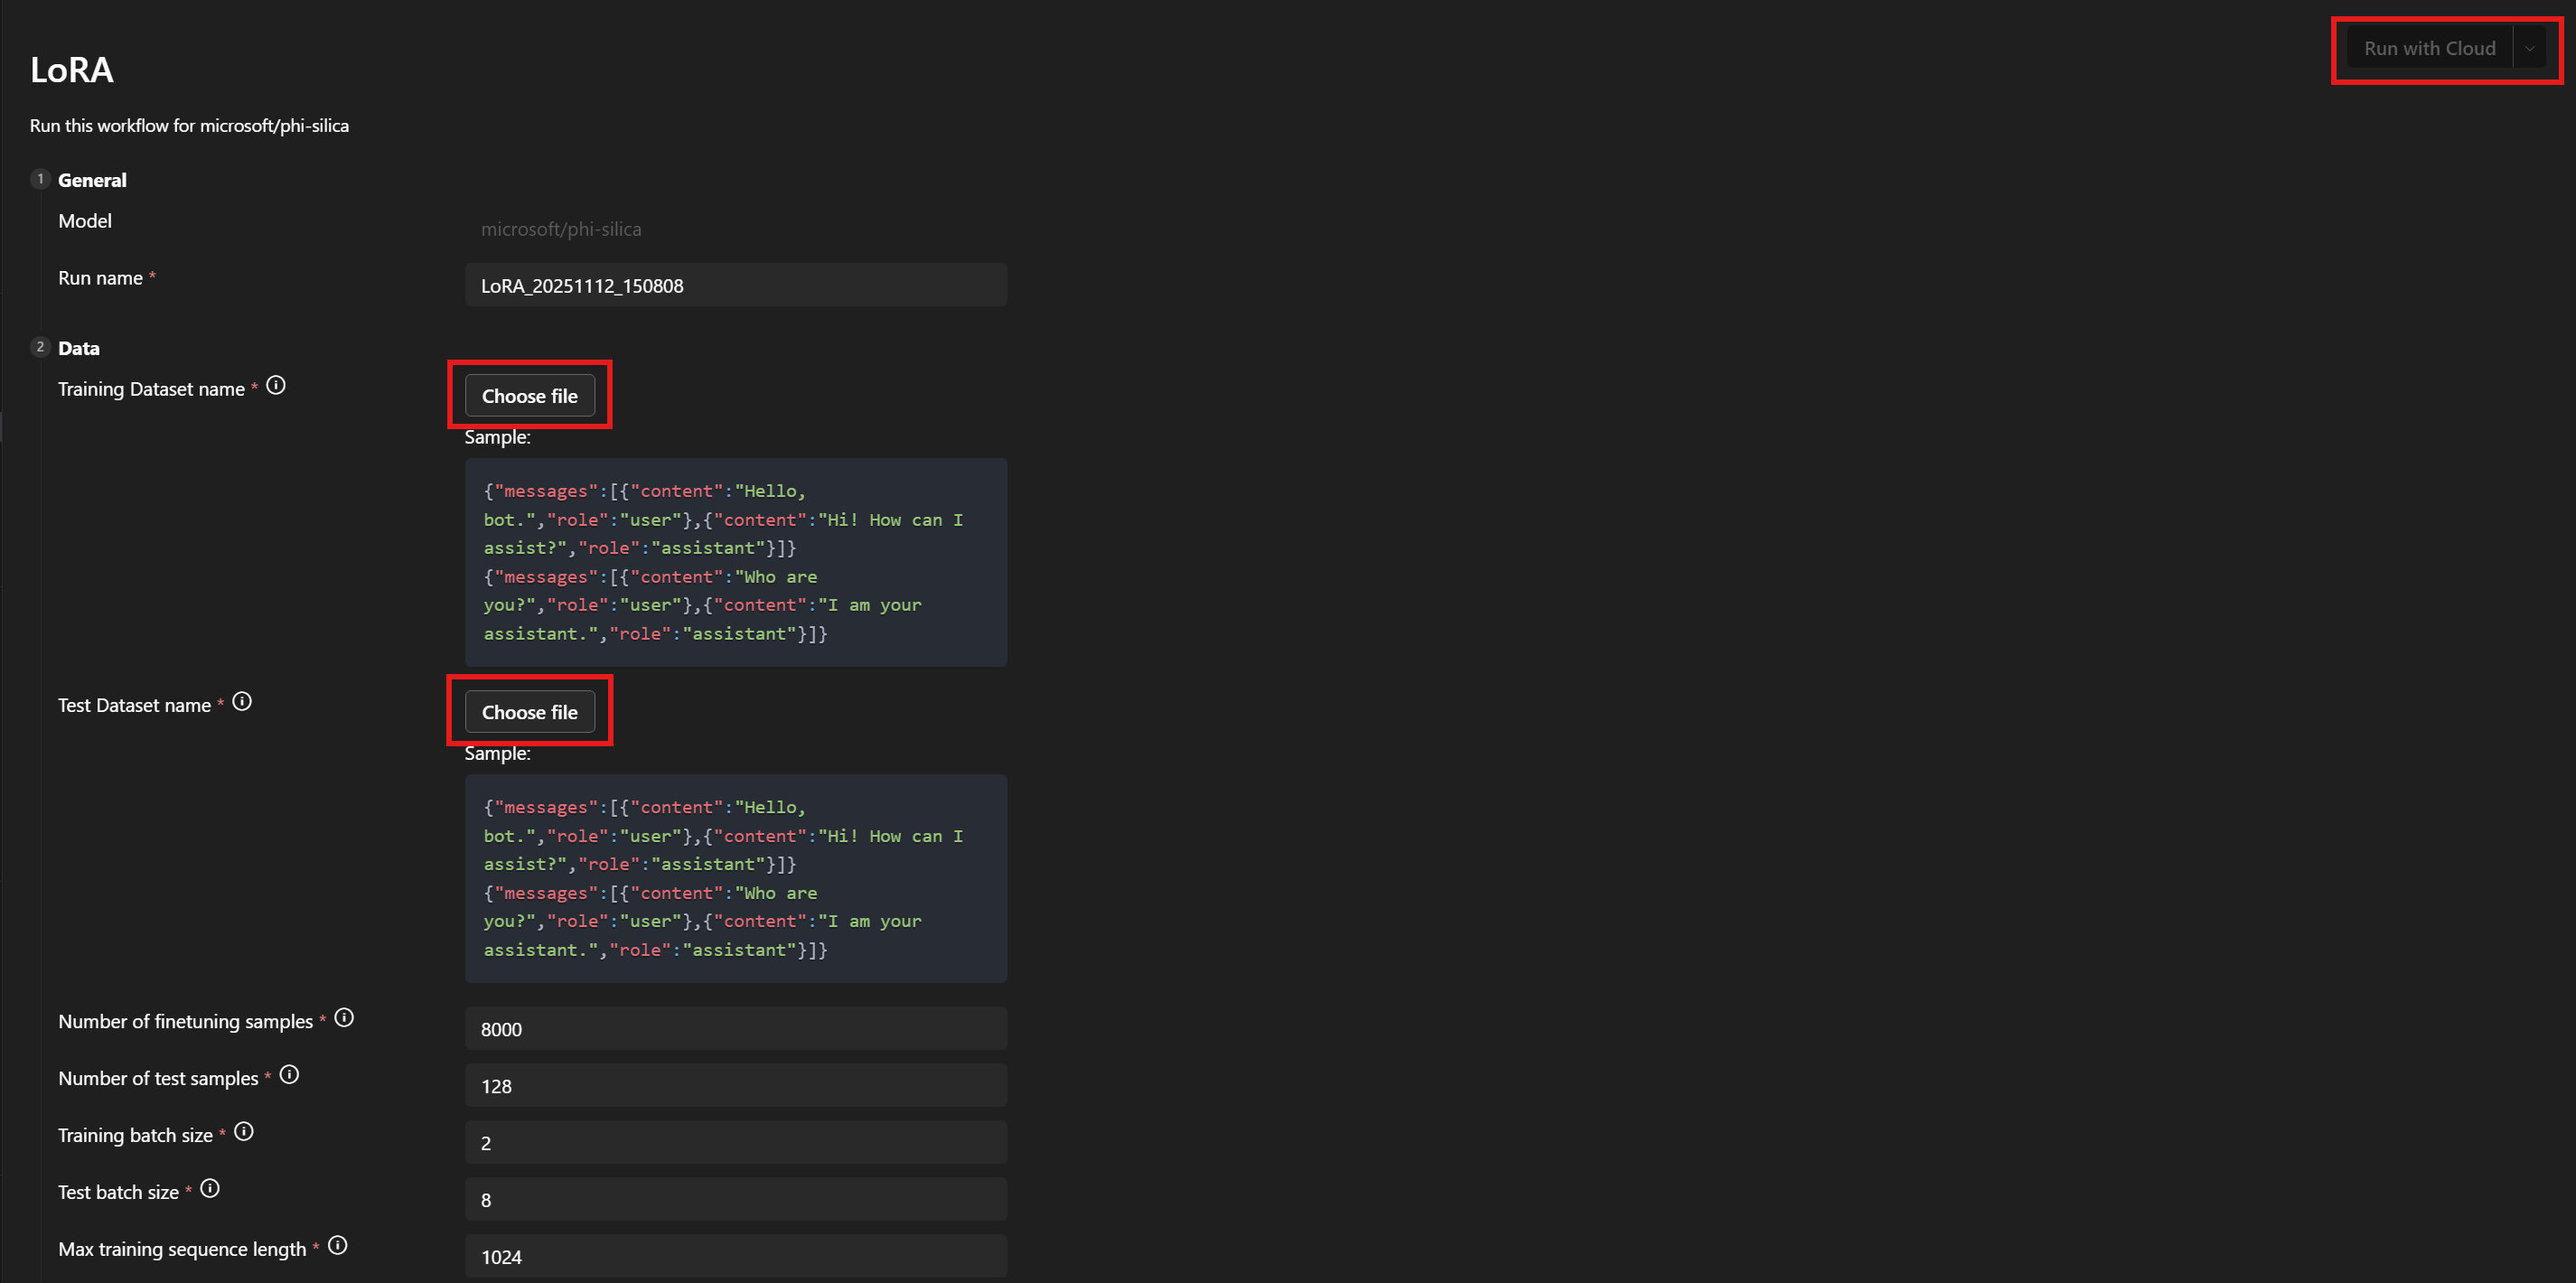
在 数据 > 训练数据集名称 和 测试数据集名称 下,选择您的
训练.json和测试.json文件。 -
选择 与云运行.
-
在对话框中,选择用于访问您的 Azure 订阅的 Microsoft 帐户。
-
一旦选择了你的账户,从订阅下拉菜单中选择一个资源组。
-
请注意,您的微调作业已成功启动并显示作业状态。
使用刷新按钮手动更新状态。微调作业通常需要45到60分钟才能完成。
-
一旦任务完成,您可以选择 下载新训练的LoRA适配器,并选择显示指标来检查微调指标。

LoRA微调建议
超参数选择
LoRA微调的默认超参数设置应该提供一个合理的基准微调来对比。我们已经尽力找到对大多数用例和数据集都有效的默认值。
然而,我们还是给你留下了灵活性,如果你愿意,可以调整参数。
训练超参数
我们的标准参数搜索空间是:
| 参数名称 | 敏 | 马克斯 | 分布 |
|---|---|---|---|
| 学习率 | 1e-4 | 1e-2 | 对数均匀分布 |
| 权重衰减 | 1e-5 | 1e-1 | 对数均匀分布 |
| 亚当_贝塔1 | 0.9 | 0.99 | 制服 |
| 亚当_贝塔2 | 0.9 | 0.999 | 制服 |
| 亚当_ε | 1e-9 | 1e-6 | 对数均匀分布 |
| 预热步数 | 0 | 10000 | 制服 |
| lora Dropout | 0 | 0.5 | 制服 |
我们还搜索学习率调度器,选择其中一个线性 warmup或余弦 warmup如果预热步数参数设置为0,那么您可以等效地使用线性或余弦选项。
学习率、学习率调度器和 warmup 步数彼此之间相互影响。固定其中两个并改变第三个,可以让你更好地了解它们如何改变在你数据集上的训练输出。
权重衰减和LoRA丢弃参数是为了帮助控制过拟合。如果你发现你的适配器不能很好地从训练集推广到评估集,尝试增加这些参数的值。
该亚当_参数影响 Adam 优化器在训练步骤中的行为。有关该优化器的更多信息,请参见例如 PyTorch 文档。
许多其他暴露的参数与PEFT库中同名的对应参数类似。有关这些信息的更多内容,请参阅transformers文档。
数据超参数
数据超参数训练样本数量和测试_样本数量控制用于训练和测试的样本数量。通常来说,使用更多的训练样本是一个好主意。使用更多的测试样本可以让你得到噪声更小的测试指标,但每次评估运行将花费更长时间。
该训练批次大小和测试批次大小参数控制每个批次在训练和测试中应使用的样本数量。通常情况下,测试可以使用更多的批次,因为运行一个测试样本所需的GPU内存比训练样本少。
该训练序列长度和测试序列长度参数控制训练和测试序列的长度。通常,越长越好,直到遇到GPU内存限制。默认值应该能提供一个良好的平衡。
选择系统提示
我们发现,在选择系统提示进行训练时,一种有效的策略是保持它相对简单(1或2句话),同时仍然鼓励模型以你想要的格式生成输出。我们还发现,为训练和推理使用稍微不同的系统提示可以提高结果。
你希望的输出与基础模型的差异越大,系统提示对你的帮助就越大。
例如,如果你只是对基础模型进行轻微的风格调整,比如使用更简明的语言来吸引年轻读者,你可能根本不需要系统提示。
然而,如果您的期望输出具有更多的结构,则您将需要使用系统提示来引导模型部分达到预期。因此,如果您需要一个具有特定键的JSON表格,您的系统提示的第一句话可以描述如果模型以普通语言回答,它的回答应该是什么样子。第二句话则可以进一步指定JSON表格的格式应该是什么样的。在训练时使用第一句话,而在推理时使用两句话,可以为您提供所需的结果。
参数
所有可以微调的参数列表附在此处。如果某个参数未出现在工作流页面用户界面中,请手动添加到<你的项目路径>/<模型名称>/lora/lora.yaml输入:.
]

################## 基本 配置 设置 #################
  {
    "groupId": "data",
    "fields": [
      {
        "name": "system_prompt",
        "type": "Optional",
        "defaultValue": null,
        "info": "Optional system prompt. If specified, the system prompt given here will be prepended to each example in the dataset as the system prompt when training the LoRA adapter. When running inference the same (or a very similar) system prompt should be used. Note: if a system prompt is specified in the training data, giving a system prompt here will overwrite the system prompt in the dataset.",
        "label": "System prompt"
      },
      {
        "name": "varied_seqlen",
        "type": "bool",
        "defaultValue": false,
        "info": "Varied sequence lengths in the calibration data. If False (default), training examples will be concatenated together until they are finetune_[train/test]_seqlen tokens long. This makes memory usage more consistent and predictable. If True, each individual example will be truncated to finetune_[train/test]_seqlen tokens. This can sometimes give better training performance, but also gives unpredictable memory usage. It can cause `out of memory` errors mid training, if there are long training examples in your dataset.",
        "label": "Allow varied sequence length in data"
      },
      {
        "name": "finetune_dataset",
        "type": "str",
        "defaultValue": "wikitext2",
        "info": "Dataset to finetune on.",
        "label": "Dataset name or path"
      },
      {
        "name": "finetune_train_nsamples",
        "type": "int",
        "defaultValue": 4096,
        "info": "Number of samples to load from the train set for finetuning.",
        "label": "Number of finetuning samples"
      },
      {
        "name": "finetune_test_nsamples",
        "type": "int",
        "defaultValue": 128,
        "info": "Number of samples to load from the test set for finetuning.",
        "label": "Number of test samples"
      },
      {
        "name": "finetune_train_batch_size",
        "type": "int",
        "defaultValue": 4,
        "info": "Batch size for finetuning training.",
        "label": "Training batch size"
      },
      {
        "name": "finetune_test_batch_size",
        "type": "int",
        "defaultValue": 8,
        "info": "Batch size for finetuning testing.",
        "label": "Test batch size"
      },
      {
        "name": "finetune_train_seqlen",
        "type": "int",
        "defaultValue": 2048,
        "info": "Maximum sequence length for finetuning training. Longer sequences will be truncated.",
        "label": "Max training sequence length"
      },
      {
        "name": "finetune_test_seqlen",
        "type": "int",
        "defaultValue": 2048,
        "info": "Maximum sequence length for finetuning testing. Longer sequences will be truncated.",
        "label": "Max test sequence length"
      }
    ]
  },
  {
    "groupId": "finetuning",
    "fields": [
      {
        "name": "early_stopping_patience",
        "type": "int",
        "defaultValue": 5,
        "info": "Number of evaluations with no improvement after which training will be stopped.",
        "label": "Early stopping patience"
      },
      {
        "name": "epochs",
        "type": "float",
        "defaultValue": 1,
        "info": "Number of total epochs to run.",
        "label": "Epochs"
      },
      {
        "name": "eval_steps",
        "type": "int",
        "defaultValue": 64,
        "info": "Number of training steps to perform before each evaluation.",
        "label": "Steps between evaluations"
      },
      {
        "name": "save_steps",
        "type": "int",
        "defaultValue": 64,
        "info": "Number of steps after which to save model checkpoint. This _must_ be a multiple of the number of steps between evaluations.",
        "label": "Steps between checkpoints"
      },
      {
        "name": "learning_rate",
        "type": "float",
        "defaultValue": 0.0002,
        "info": "Learning rate for training.",
        "label": "Learning rate"
      },
      {
        "name": "lr_scheduler_type",
        "type": "str",
        "defaultValue": "linear",
        "info": "Type of learning rate scheduler.",
        "label": "Learning rate scheduler",
        "optionValues": [
          "linear",
          "linear_with_warmup",
          "cosine",
          "cosine_with_warmup"
        ]
      },
      {
        "name": "num_warmup_steps",
        "type": "int",
        "defaultValue": 400,
        "info": "Number of warmup steps for learning rate scheduler. Only relevant for a _with_warmup scheduler.",
        "label": "Scheduler warmup steps (if supported)"
      }
    ]
  }


################## Advanced config settings ##################


  {
    "groupId": "advanced",
    "fields": [
      {
        "name": "seed",
        "type": "int",
        "defaultValue": 42,
        "info": "Seed for sampling the data.",
        "label": "Random seed"
      },
      {
        "name": "evaluation_strategy",
        "type": "str",
        "defaultValue": "steps",
        "info": "Evaluation strategy to use.",
        "label": "Evaluation strategy",
        "optionValues": [
          "steps",
          "epoch",
          "no"
        ]
      },
      {
        "name": "lora_dropout",
        "type": "float",
        "defaultValue": 0.1,
        "info": "Dropout rate for LoRA.",
        "label": "LoRA dropout"
      },
      {
        "name": "adam_beta1",
        "type": "float",
        "defaultValue": 0.9,
        "info": "Beta1 hyperparameter for Adam optimizer.",
        "label": "Adam beta 1"
      },
      {
        "name": "adam_beta2",
        "type": "float",
        "defaultValue": 0.95,
        "info": "Beta2 hyperparameter for Adam optimizer.",
        "label": "Adam beta 2"
      },
      {
        "name": "adam_epsilon",
        "type": "float",
        "defaultValue": 1e-08,
        "info": "Epsilon hyperparameter for Adam optimizer.",
        "label": "Adam epsilon"
      },
      {
        "name": "num_training_steps",
        "type": "Optional",
        "defaultValue": null,
        "info": "The number of training steps there will be. If not set (recommended), this will be calculated internally.",
        "label": "Number of training steps"
      },
      {
        "name": "gradient_accumulation_steps",
        "type": "int",
        "defaultValue": 1,
        "info": "Number of updates steps to accumulate before performing a backward/update pass.",
        "label": "gradient accumulation steps"
      },
      {
        "name": "eval_accumulation_steps",
        "type": "Optional",
        "defaultValue": null,
        "info": "Number of predictions steps to accumulate before moving the tensors to the CPU.",
        "label": "eval accumulation steps"
      },
      {
        "name": "eval_delay",
        "type": "Optional",
        "defaultValue": 0,
        "info": "Number of epochs or steps to wait for before the first evaluation can be performed, depending on the eval_strategy.",
        "label": "eval delay"
      },
      {
        "name": "weight_decay",
        "type": "float",
        "defaultValue": 0.0,
        "info": "Weight decay for AdamW if we apply some.",
        "label": "weight decay"
      },
      {
        "name": "max_grad_norm",
        "type": "float",
        "defaultValue": 1.0,
        "info": "Max gradient norm.",
        "label": "max grad norm"
      },
      {
        "name": "gradient_checkpointing",
        "type": "bool",
        "defaultValue": false,
        "info": "If True, use gradient checkpointing to save memory at the expense of slower backward pass.",
        "label": "gradient checkpointing"
      }
    ]
  }
]
修改 Azure 订阅和资源组
如果您想修改之前设置的 Azure 订阅和资源组,可以在 <你的项目路径>/model_lab.workspace.provision.config文件。
使用 Phi 硅 LoRA 适配器进行推理
Phi Silica API 是有限访问功能的一部分(见 LimitedAccessFeatures 类)。欲了解更多信息或请求解锁令牌,请使用 LAF 访问令牌请求表单。
目前,使用 Phi Silica LoRA 适配器进行推理仅支持在配备 ARM 处理器的 Copilot+ 电脑上进行。
使用 Windows AI API 进行推理:使用 LoRA 适配器的 Phi 硅